Eric Louis

Thousand tons of tools
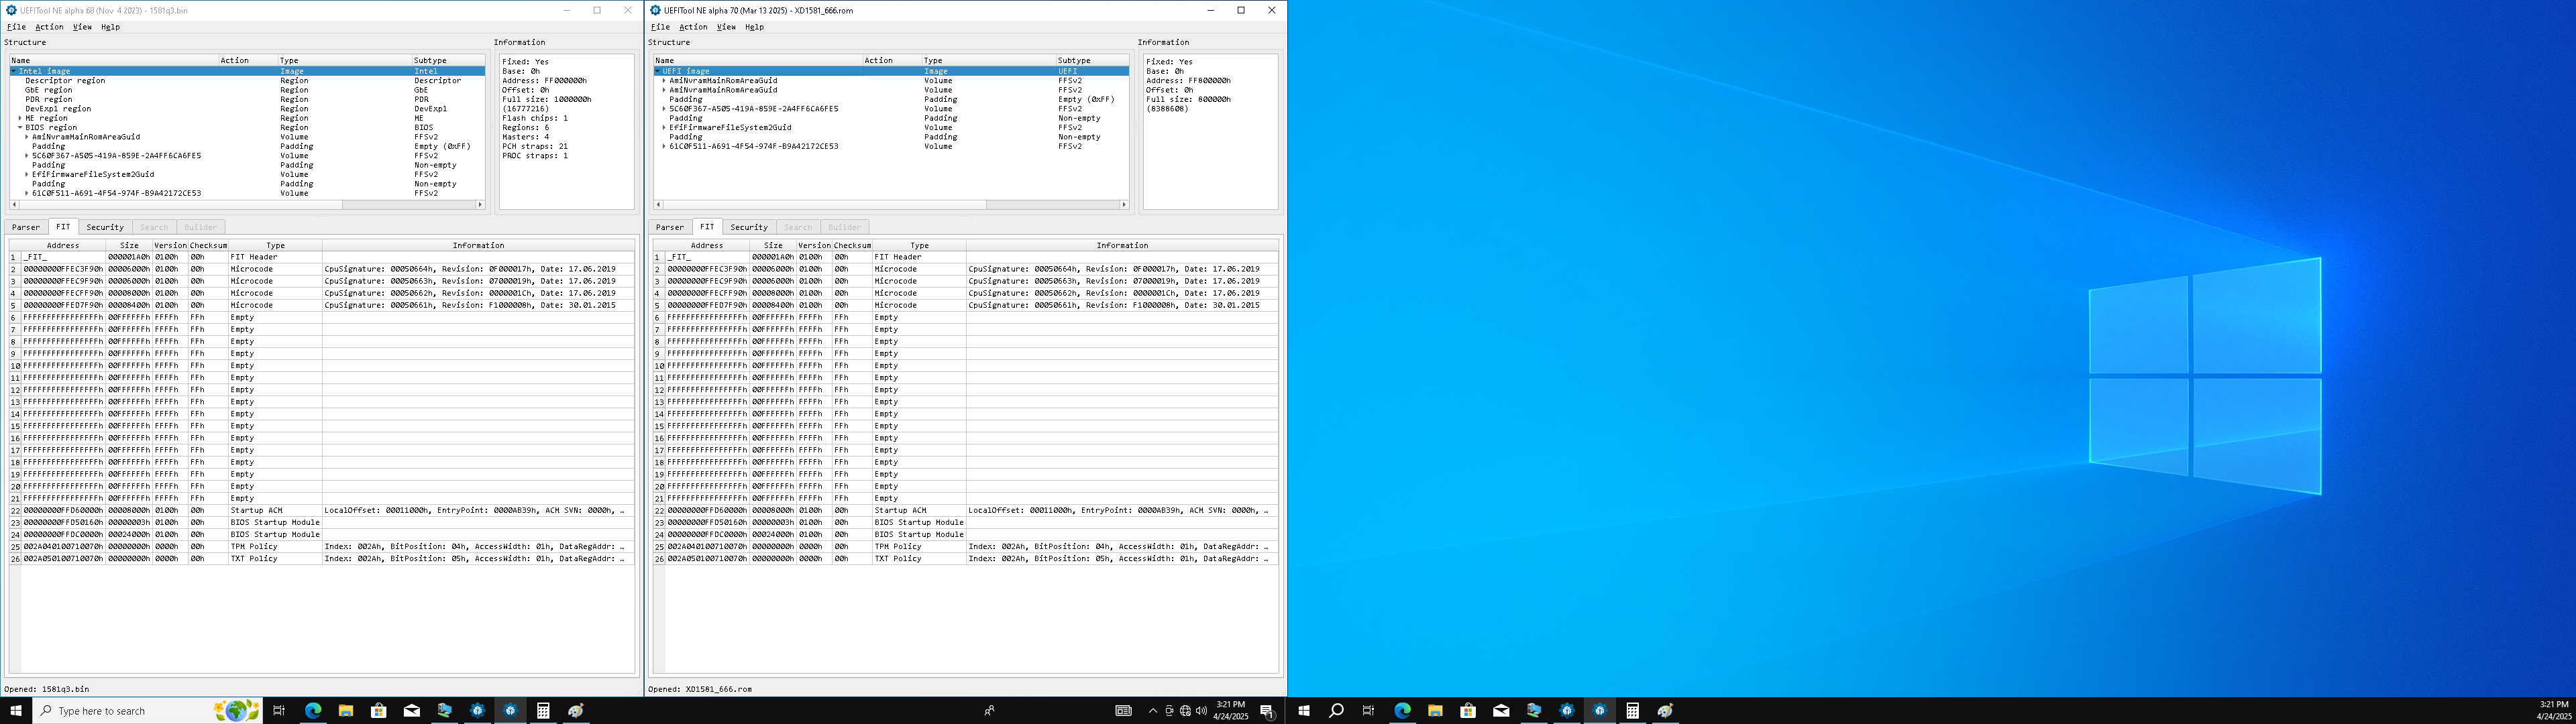
AMI MMTools
Latest Overclocking Programs, System Info, Benchmarking, & Stability Tools – TweakTown Forums

AS my opinioin,
1) first of all Extract the original BIOS from windows
2) use tools mod what you’re looking for,
3) then save as another bin/rom file
4) rename the file and burn it with autoexecbat in UEFI mode into your USB
5) final, let it auto update itself.

Eric Louis

Proxmox Installation with Passthrough Guest into W10 then Mount & Use Existing NTFS Drive without Format

Proxmox Installation with Passthrough Guest into W10 then Mount & Use Existing NTFS Drive without Format
Menthod 2: reference URL: (using GUI)

https://dae.me/blog/2340/how-to-add-an-existing-virtual-disk-to-proxmox/

1 update VM 100: -sata1 /dev/disk/by-id/ata-WDC_WD20EFRX-68EUZN0_WD-xxxxxxxx

——————————————————-

Menthod 1: reference URL: (using Command Line)
https://www.cnblogs.com/wukongroot/p/15513228.html

ls /dev/disk/by-id
Shown as similar information as below

ata-TOSHIBA_Q300._xxxxxxxx
ata-TOSHIBA_Q300._xxxxxxxx-part1
ata-TOSHIBA_Q300._xxxxxxxx-part2
ata-TOSHIBA_Q300._xxxxxxxx-part3
ata-WDC_WD20EFRX-68EUZN0_WD-xxxxxxxx
ata-WDC_WD20EFRX-68EUZN0_WD-xxxxxxxx-part1
qm set 100 -sata1 /dev/disk/by-id/ata-WDC_WD20EFRX-68EUZN0_WD-xxxxxxxx

It will be return as below


https://takacsmark.com/docker-swarm-tutorial-for-beginners/#your-first-swarm-cluster

Docker Swarm Tutorial | Code Along | Zero to Hero under 1 Hour

Tutorial Docker Swarm Tutorial | Code Along | Zero to Hero under 1 Hour

Márk Takács Mark Takacs

Márk Takács

· 30,369 views

Learn Docker Get the book today

Learn to build, ship and run highly scalable applications with Docker containers.

$34.99 $15.99 – Download the book 54% OFF.

In this Docker Swarm tutorial we’ll build the basic Swarm skills that you’ll need in your project work. You’ll learn to set up a Swarm cluster, Deploy applications, explore and manage your stack in the cluster, and we’ll also go through typical maintenance activities that you’ll need.

This is a code-along tutorial, so please open up your terminal and get ready. We’ll use a two step approach:

  1. We’ll set up a cluster and deploy an application first. The goal here is to show you what Swarm is all about and what it’s capable of. We’ll set up a one machine cluster on your local machine first, and then we’ll set up a cluster of two hosts.
  2. Once you get the big picture in step 1, I’ll explain all details behind. I think it’s easier to learn and understand after you’ve seen the stuff in action.

If you want to jump to a specific step, please check out the table of contents above.

In order to get the most out of this article you should be familiar with basic Docker concepts, like containers, images, the Dockerfile and Docker Compose. If you need a refresher on these topics, please go to my previous tutorials first. Alternatively you can get my book for a complete guided experience.

This tutorial is available as a Youtube video, too.

Your first Swarm cluster

Swarm is Docker’s built in container orchestrator solution, its main purpose is to manage containers in a computer cluster, i.e. a set of connected computers that work together.

Swarm comes built into the Docker Engine, you don’t need to install anything to get started. (You need to have Docker installed, of course, but you don’t need extra components.)

Let’s go to terminal and turn your local computer into a one machine Swarm cluster.

$ docker swarm init

Swarm initialized: current node (dw78e2gl8jm13basl0nqmcivz) is now a manager.

To add a worker to this swarm, run the following command:

    docker swarm join --token SWMTKN-1-0bwv7h6u9c49p49xc5hpapb1vsu9vdmcwtatuuh3ultmbq7j8m-9dmuana0kx039475l13cit1n2 192.168.65.3:2377

To add a manager to this swarm, run 'docker swarm join-token manager' and follow the instructions.

Computers in a Swarm cluster are called nodes. Nodes can play two roles in a Swarm:

  • The role of manager nodes is to manage the cluster; you can execute Swarm management commands on manager nodes.
  • The role of worker nodes is to run your containers that do the actual job (like running a web server).

A Swarm node acts as both worker and manager by default, the default behavior is to schedule worker containers on manager nodes, too.

The above command output tells you that this node is now a manager and it also gives you the command that you can use to add further machines to the Swarm.

Your local machine is the manager node in the cluster, and at the same time it is also the single worker node that you can deploy containers to. Let’s deploy something cool!

Your first Swarm deployment

Let’s create a Node Express application with the following files:

$ tree
.
├── Dockerfile
├── docker-compose.yml
├── package-lock.json
├── package.json
└── server.js

Let’s create the package.json and package-lock.json files first with the use of a Docker container:

$ docker run --rm -v $(pwd):/home/node -w /home/node node:11.1.0-alpine npm init -y
$ docker run --rm -v $(pwd):/home/node -w /home/node node:11.1.0-alpine npm i -S express

The first command will initialize our package.json file with default values. The second command installs Express and saves Express as a dependency into package.json. The second command also generates package-lock.json.

Let’s create server.js with the following code:

const express = require("express");
const os = require("os");

const app = express();

app.get("/", (req, res) => {
  res.send("Hello from Swarm " + os.hostname());
});

app.listen(3000, () => {
  console.log("Server is running on port 3000");
});

This piece of code will start up an Express server and will display a message that includes the identifier of the container where the server is running. We achieve this by adding os.hostname() to the response, os.hostname() in the Docker context will display the container ID rather than the host name. I added the container ID to the message, so that we can see where the responses are coming from as we scale our service to multiple replicas later.

Let’s add the Dockerfile to the solution to copy our package.json, package-lock.json and server.js into a Node image, install Node dependencies and specify npm start as the default command. (Note, that the default value of npm start in the package.json file is node server.js, so we are just telling Docker to run our server.js file with Node.)

FROM node:11.1.0-alpine

WORKDIR /home/node

COPY . .

RUN npm install

CMD npm start

In order to define the build and runtime behavior of our project, we add the following Compose file:

version: "3"

services:
  web:
    build: .
    image: takacsmark/swarm-example:1.0
    ports:
      - 80:3000
    networks:
      - mynet

networks:
  mynet:

We specified one service in the Compose file for the Express server, mapped the port to port 80 and defined a default network for the stack.

Let’s build our image.

$ docker-compose build

I you are familiar with Compose, you know that we can start this stack with the docker-compose up command, but we will not do this. We will start the stack in Swarm.

You might be asking yourself right now; how are we going to start the stack in Swarm mode with a Compose file?

Docker Swarm is designed in a very practical way; you can use the Compose file to start up your application stack in Swarm.

Let’s do this and I’ll explain what’s happening. The command to start the stack is the following:

$ docker stack deploy nodeapp -c docker-compose.yml
Ignoring unsupported options: build

Creating network nodeapp_mynet
Creating service nodeapp_web

Where docker stack is the management command to manage your stack deployments in the Swarm. We used the deploy subcommand to deploy the stack and we named the stack nodeapp. You can use any name that you like. The rest of the command, -c docker-compose.yml, specifies the Compose file that describes the deployment.

Docker created the network that we defined in the Compose file and prefixed the network name with the name of the stack, hence the final name, nodeapp_mynet. Docker also created a service called nodapp_web. Please note that Docker Compose creates containers when you start up a multi-container application, while the Swarm created and entity that’s called a service. A service is a new entity that we use to configure the behavior of our containers in the Swarm, we’ll have a closer look at it in a minute.

Please also note the first line of the command output above that says Ignoring unsupported options: build. This line tells us that Swarm does not support the build option in the Compose file. I’ll also tell you about the difference between Compose and Swarm in a minute.

Let’s see the results of our work first, please visit http://localhost; you should see a message like this one: Hello from Swarm 63daead91754.

Docker Swarm Scaled Service Host Name 1

Explore the stack

We deployed a stack to the Swarm based on the description in the Compose file. We can see our deployed stack with a simple command:

$ docker stack ls
NAME                SERVICES            ORCHESTRATOR
nodeapp             1                   Swarm

The output says that we have one service running, which is in line with what we defined in the Compose file. Docker gives us more control over our stack, we can explore services in the stack in more details:

$ docker stack services nodeapp
ID                  NAME                MODE                REPLICAS            IMAGE                          PORTS
og72l2onptng        nodeapp_web         replicated          1/1                 takacsmark/swarm-example:1.0   *:80->3000/tcp

Now we have access to the service identifier, the service name, number of replicas, image and port information. We can go one level deeper and explore a lower level scheduling entity in the stack, called the task:

$ docker stack ps nodeapp
ID                  NAME                IMAGE                          NODE                    DESIRED STATE       CURRENT STATE               ERROR               PORTS
nv0vu1micwh7        nodeapp_web.1       takacsmark/swarm-example:1.0   linuxkit-025000000001   Running             Running about an hour ago

As you can see, we have exactly one task running in our stack on the single node in our cluster right now.

Your first scaled service

Let’s scale our service to run multiple replicas.

$ docker service scale nodeapp_web=4
nodeapp_web scaled to 4
overall progress: 4 out of 4 tasks
1/4: running   [==================================================>]
2/4: running   [==================================================>]
3/4: running   [==================================================>]
4/4: running   [==================================================>]
verify: Service converged

We used the docker service scale command to start more replicas of our service. Let’s check the service status:

$ docker service ls
ID                  NAME                MODE                REPLICAS            IMAGE                          PORTS
og72l2onptng        nodeapp_web         replicated          4/4                 takacsmark/swarm-example:1.0   *:80->3000/tcp

The output says that we have 4/4 replicas running. Let’s check the individual tasks:

$ docker service ps nodeapp_web
ID                  NAME                IMAGE                          NODE                    DESIRED STATE       CURRENT STATE               ERROR               PORTS
nv0vu1micwh7        nodeapp_web.1       takacsmark/swarm-example:1.0   linuxkit-025000000001   Running             Running about an hour ago
acd8h7clttsy        nodeapp_web.2       takacsmark/swarm-example:1.0   linuxkit-025000000001   Running             Running 2 minutes ago
ip2l6ldbxk6j        nodeapp_web.3       takacsmark/swarm-example:1.0   linuxkit-025000000001   Running             Running 2 minutes ago
rbwuk4v7wqu0        nodeapp_web.4       takacsmark/swarm-example:1.0   linuxkit-025000000001   Running             Running 2 minutes ago

Docker started four tasks automatically for our scaled service. Docker displays all tasks running on our single node in the cluster.

If you go to http://localhost and refresh the page a few times, you’ll get alternating host names, because your request is served from different replicated containers. (Make sure to clear the browser cache during refresh to see the results, you can easily do this with CMD+SHIFT+R on Mac or CTRL+F5 on Windows and Linux, this will work with most browsers.)

Docker Swarm Scaled Service Host Name 1

Docker Swarm Scaled Service Host Name 1

Set up a cluster with multiple hosts

Let’s step one level higher and create a cluster with multiple machines. Let’s remove our stack first and leave the Swarm on the local machine.

$ docker stack rm nodeapp
Removing service nodeapp_web
Removing network nodeapp_mynet

$ docker swarm leave --force
Node left the swarm.

We stay on the local machine for this exercise, I hope your computer has the power to run two virtual machines in parallel. If you don’t have the power, you can do this exercise on Play with Docker.

Docker has a handy tool called Docker machine that lets us create virtual machines locally and also in the cloud. Docker machine comes bundled with Docker on Mac and Windows, and it needs to be installed on Linux. Please refer to the official documentation if you need to install Docker machine.

Let’s start up two VMs locally. Please make sure you have Virtualbox installed before proceeding. Issue the below commands in terminal, please be patient it will take a while to create the machines.

$ docker-machine create --driver virtualbox myvm1
$ docker-machine create --driver virtualbox myvm2

Both machines should be up and running after creation. You can check their status with the docker-machine ls command.

Let’s ssh into machine 1 and start our Swarm. This machine has multiple network interfaces, so we need to fine-tune to our command to advertise the right network address in the Swarm.

$ docker-machine ssh myvm1
   ( '>')
  /) TC (\   Core is distributed with ABSOLUTELY NO WARRANTY.
 (/-_--_-\)           www.tinycorelinux.net

docker@myvm1:~$ docker swarm init --advertise-addr eth1
Swarm initialized: current node (yttgwlrspn5ln3ho1qffiy4op) is now a manager.

To add a worker to this swarm, run the following command:

    docker swarm join --token SWMTKN-1-678250sc60og59wbwf25z6xwiz5a1ufg2q6skgxh7ccu0lx7w5-4dza21v2frlv5dbali96x8mw4 192.168.99.100:2377

To add a manager to this swarm, run 'docker swarm join-token manager' and follow the instructions.

Leave the machine with the exit command and ssh into machine 2 and join the Swarm on machine 1. We can do this by using the command from the above command output docker swarm join --token SWMTKN-1-678250sc60og59wbwf25z6xwiz5a1ufg2q6skgxh7ccu0lx7w5-4dza21v2frlv5dbali96x8mw4 192.168.99.100:2377. Please make sure that you copy the join command from your command output.

$ docker-machine ssh myvm2
   ( '>')
  /) TC (\   Core is distributed with ABSOLUTELY NO WARRANTY.
 (/-_--_-\)           www.tinycorelinux.net

docker@myvm2:~$ docker swarm join --token SWMTKN-1-678250sc60og59wbwf25z6xwiz5a1ufg2q6skgxh7ccu0lx7w5-4dza21v2frlv5dbali96x8mw4 192.168.99.100:2377
This node joined a swarm as a worker.

Now we have two machines in the Swarm. In order to deploy our Node example application to the Swarm we need to make sure that our project’s Docker image is available to the virtual machines. Our workflow on a real project would be to automatically build and push our tested Docker images to a central repository. So we’ll do exactly this, we’ll push our Docker image to the Docker Hub into a public repository.

$ docker-compose push

Once the image is pushed, we want to find a way to use the Compose file that is stored on our host machine in the Docker machine VM. Docker machine has a feature to enable this. We just need to set our shell to talk to the Docker daemon in the VM. We use the docker-machine env <vm_name> command to configure the shell, and then grab the last line of the command output and execute it.

$ docker-machine env myvm1
export DOCKER_TLS_VERIFY="1"
export DOCKER_HOST="tcp://192.168.99.100:2376"
export DOCKER_CERT_PATH="/Users/takacsmark/.docker/machine/machines/myvm1"
export DOCKER_MACHINE_NAME="myvm1"
# Run this command to configure your shell:
# eval $(docker-machine env myvm1)
$ eval $(docker-machine env myvm1)

Now we can deploy our application the usual way.

$ docker stack deploy nodeapp -c docker-compose.yml
Ignoring unsupported options: build

Creating network nodeapp_mynet
Creating service nodeapp_web

Once the deployment is done, you can access your application at the address of the virtual machines. You can find out the address with a simple command.

$ docker-machine ls
NAME    ACTIVE   DRIVER       STATE     URL                         SWARM   DOCKER     ERRORS
myvm1   *        virtualbox   Running   tcp://192.168.99.100:2376           v18.09.1
myvm2   -        virtualbox   Running   tcp://192.168.99.101:2376           v18.09.1

You can use the IP address of any of the machines to access the application. Let’s use the address of myvm1 in the browser.

Docker Swarm Node app running in VM

Why not load the cluster with a few replicas and check out the whole thing in a nice visual representation?

$ docker service scale nodeapp_web=4

We just scaled up our service, let’s add another service to the Swarm to create a visualizer.

$ docker service create \
-p 8080:8080 \
--constraint=node.role==manager \
--mount=type=bind,src=/var/run/docker.sock,dst=/var/run/docker.sock \
dockersamples/visualizer

We started a container from the dockersamples/visualizer image, we gave it a constraint to run on a manager node and made it available on port 8080. Now if you visit port 8080 on any VM in the browser you’ll get a visual webpage like the one below.

Docker Swarm VM visualizer

You can clearly see on the figure that myvm1 is the manger node in the cluster, myvm2 is the worker and both nodes have containers scheduled on them. The visualizer is running on the manager node, because we defined a constraint to run on a node that has a manager node. (This constraint was needed by the way, because the visualizer can collect the Swarm info on a manager node only.)

Now that we have seen some of the basic functionality of Docker Swarm, let’s move on and let’s understand what’s going on in the background.

What is Docker Swarm mode

Docker was designed with multi-host, horizontally scaled production operations in mind. This is a great benefit to your projects, because you can run multiple instances of your application containers and distribute them on multiple servers, so that you can cope with load peaks coming from user requests.

Docker has built-in features to manage your application across several computers, i.e. a computer cluster. This solution is called the Swarm mode.

Swarm comes integrated into the Docker Engine, so you don’t need to install any new component to use Swarm, it’s available out of the box.

What is the difference between Docker Compose and Swarm

We used Docker Compose to run applications in previous tutorials. The key difference between Docker Compose and Swarm is that Compose is limited to a single host.

You can use Compose to run multiple containers that are connected over a number of user defined networks, but this solution is always limited to a single host. If you need to run your application on a cluster of multiple hosts, you need Swarm.

As you have seen in the example, we can use the usual Compose file with both Compose and Swarm. You will find that certain options in the Compose file will only work with either Compose or Swarm. The unsupported options will be simply ignored by Docker commands.

The build option, for example, is supported by Compose only and you can use it to build your services’ images as described in the Compose file. However if you run a stack with build settings in Swarm, you’ll notice that you get the message that tells you that build is not supported by Swarm. Swarm will simply ignore the build configuration in the Compose file. We had this message in our example.

The deploy option, for example is only supported by Swarm. You can use the deploy setting to describe your deployment configuration in a Swarm. Compose does not support these settings and it will simply ignore this part of your Compose file.

The Compose file reference specifies exactly whether an option is limited to either Compose or Swarm. We use the same file reference in both cases and we always double check if the settings are applicable to Swarm or Compose only.

Services, tasks and containers

You saw that Docker created services when we deployed our stack with docker stack deploy in the example.

We introduced services with Docker Compose, and our definition was something like this: Define your application’s logical components in the Compose file as services. One service should be based on one Docker image and one service should be in charge of one specific aspect of your application.

A good example of a service would be your Apache web server, a Redis database, a RabbitMQ queue, a Node app or other similar logical units of your application.

The notion of service in the Swarm follows the same concept. When in Swarm mode, Docker will provision and scale your application services automatically.

There is a dedicated command called docker service to manage services in the Swarm, we’ll have a look at it in a minute.

Docker introduced a new term with Swarm, called the task. The task is a scheduling slot for your containers in the service. Each task invokes exactly one container.

The logical hierarchy of components is stack, service, task and container, so we’ll look at these entities in this order from top to the bottom.

To see our stack(s) we use the docker stack ls command.

$ docker stack ls
NAME                SERVICES            ORCHESTRATOR
nodeapp             1                   Swarm

Our deployed stack is displayed in the output. It has one service (visualizer was added separately, that’s why it’s not displayed.) You can use multiple stacks in real projects to deploy various parts of your architecture. You may have a separate front-end, back-end and operations stack, for example.

We can list the services in our stack with docker stack services nodeapp or the services in the entire Swarm with docker service ls, let’s try the latter.

$ docker service ls
ID                  NAME                     MODE                REPLICAS            IMAGE                             PORTS
vtj81lstp1lw        nodeapp_web              replicated          4/4                 takacsmark/swarm-example:1.0      *:80->3000/tcp
6rlou1x03dgf        recursing_visvesvaraya   replicated          1/1                 dockersamples/visualizer:latest   *:8080->8080/tcp

This is the overview of all the services in our Swarm cluster. We are running four replicas of our Node application and one instance of visualizer.

Let’s look at the tasks in the nodeapp_web service.

$ docker service ps nodeapp_web
4alkk6og8pae        nodeapp_web.1       takacsmark/swarm-example:1.0   myvm1               Running             Running about an hour ago
ixjb3ztdumfw        nodeapp_web.2       takacsmark/swarm-example:1.0   myvm2               Running             Running 44 minutes ago
fyl2c8gw7rqe        nodeapp_web.3       takacsmark/swarm-example:1.0   myvm1               Running             Running 44 minutes ago
1w8ou7h4g15f        nodeapp_web.4       takacsmark/swarm-example:1.0   myvm2               Running             Running 44 minutes ago

This output tells us that we have two tasks running on myvm1 and another two tasks running on myvm2. Remember, a task is a logical slot where Docker schedules containers, so there is exactly one container running per each task, but a task is not something you can manage yourself. There is no docker task command to manage tasks.

If you want to change the set-up, you have to change the service configuration. If you need to run a command in a running container with exec, then you need to work with the container directly.

Manage your stack

We used the docker stack deploy command to deploy our stack. This command has a few more options to manage stacks. Let’s have a look at the most important ones.

List stacks

Use the docker stack ls command to list stacks in your Swarm. Remember, you can use multiple stacks in your application architecture design.

List services in the stack

Use the docker stack services command to list the services in a stack.

$ docker stack services nodeapp
ID                  NAME                MODE                REPLICAS            IMAGE                          PORTS
vtj81lstp1lw        nodeapp_web         replicated          4/4                 takacsmark/swarm-example:1.0   *:80->3000/tcp

List tasks in a stack

Use the docker stack ps command to list tasks in a stack.

$ docker stack ps nodeapp
ID                  NAME                IMAGE                          NODE                DESIRED STATE       CURRENT STATE               ERROR               PORTS
4alkk6og8pae        nodeapp_web.1       takacsmark/swarm-example:1.0   myvm1               Running             Running about an hour ago
ixjb3ztdumfw        nodeapp_web.2       takacsmark/swarm-example:1.0   myvm2               Running             Running about an hour ago
fyl2c8gw7rqe        nodeapp_web.3       takacsmark/swarm-example:1.0   myvm1               Running             Running about an hour ago
1w8ou7h4g15f        nodeapp_web.4       takacsmark/swarm-example:1.0   myvm2               Running             Running about an hour ago

Remove one or more stacks

You can remove your stack with the docker stack rm command. Let’s not use it right now, we’ll still need our running stack.

Manage services

Manage service in your Swarm with the docker service command and its subcommands.

Create a service

We used this command before when we created the visualizer service. The command comes in the form of docker service create and has many options to fine-tune your service. You can explore the options with docker service create --help or use the official reference.

Many options are similar to the options of docker container run and you’ll find options that are specific to Swarm mode.

List services

We used the docker service ls command before to list the services in the Swarm.

List tasks

We used the docker service ps <service_name> command before to list the tasks in your Node application service.

Scale a service

We used the docker service scale command before to scale our service.

See the logs of a service

Use the docker service logs command to see the logs of a service, the options are similar to the options of docker container logs.

$ docker service logs --tail 1 nodeapp_web
nodeapp_web.1.4alkk6og8pae@myvm1    | Server is running on port 3000
nodeapp_web.3.fyl2c8gw7rqe@myvm1    | Server is running on port 3000
nodeapp_web.2.ixjb3ztdumfw@myvm2    | Server is running on port 3000
nodeapp_web.4.1w8ou7h4g15f@myvm2    | Server is running on port 3000

As you can see, the service logs are displayed for all tasks that belong to the service.

Update a service

Use the docker service update command to update the configuration of a service. You can change the configuration that you specified with docker service create with this command.

Rollback service changes

After you applied changes to your service with the docker service update command, you can revert to the previous state with the docker service rollback command, if needed.

Manage tasks and containers

As I mentioned before, you do not manage tasks and containers in the Swarm directly. I emphasize this point again, because many experts feel tempted to hack the containers on the lowest level directly when something needs to be fixed asap. If you need to apply changes to your configuration, please reconfigure your services and drive your Swarm with the service configurations.

If you still need to look inside a container to check something during troubleshooting use the regular docker container commands.

Manage nodes

Docker Swarm has dedicated commands for node management.

List nodes

Use the docker node ls command to list nodes in the Swarm.

$ docker node ls
ID                            HOSTNAME            STATUS              AVAILABILITY        MANAGER STATUS      ENGINE VERSION
yttgwlrspn5ln3ho1qffiy4op *   myvm1               Ready               Active              Leader              18.09.1
tsmjsfj4f9ht5fefxwy2h7nve     myvm2               Ready               Active                                  18.09.1

You can see that both nodes are listed in the command output. It is clear that myvm1 is the leader and the Docker engine versions are also displayed. Please note the little * next to the ID of myvm1, the asterisk denotes that this is the active node, in other words my shell commands are connected to this node. Remember, we used the eval $(docker-machine env myvm1) command to configure the shell properly.

Add deployment configuration to the Compose file

Let’s update our example with Swarm deployment configuration for our services. I’ll add the visualizer service to the Compose file, too.

version: "3"

services:
  web:
    build: .
    image: takacsmark/swarm-example:1.0
    ports:
      - 80:3000
    networks:
      - mynet
    deploy:
      replicas: 6
      update_config:
        parallelism: 2
        delay: 10s
      restart_policy:
        condition: on-failure

  visualizer:
    image: dockersamples/visualizer:stable
    ports:
      - "8080:8080"
    volumes:
      - "/var/run/docker.sock:/var/run/docker.sock"
    deploy:
      placement:
        constraints: [node.role == manager]

networks:
  mynet:

Let’s update our stack! Please remove the visualizer service first, because we will recreate it with the use of the Compose file. Use the service name that you get with docker service ls in the docker servicer rm command. My looks like this:

$ docker service rm recursing_visvesvaraya
recursing_visvesvaraya

Please note that I added deployment preferences to our Node server; we’ll run 6 replicas, I configured the rolling updates to update 2 containers at a time with a 10s delay between update groups and I also configured a restart policy to restart containers on-failure.

It’s a common option to specify resources in the Compose file with the resources option under deploy. You can limit and reserve CPU and memory for your containers with the use of resources.

In the visualizer service I have specified the placement of the container with the constraint that is should be placed on a manager node. Docker gives you further options like node.id, node.hostname to define your constraints, but in real life, you’ll probably set up your own labels to be as flexible as possible with your placement. Check out the node.labels and engine.labels constraints. You can read more about this in the official Docker documentation.

Let’s re-deploy our stack.

$ docker stack deploy nodeapp -c docker-compose.yml
Ignoring unsupported options: build

Creating network nodeapp_default
Creating service nodeapp_visualizer
Updating service nodeapp_web (id: vtj81lstp1lwcexhyhdr02xi1)

As you can see, Docker has updated our stack automatically. Let’s see what’s happening in our stack.

$ docker stack ps nodeapp
ID                  NAME                   IMAGE                             NODE                DESIRED STATE       CURRENT STATE                 ERROR               PORTS
iimb6icg7a7j        nodeapp_web.1          takacsmark/swarm-example:1.0      myvm1               Running             Running about a minute ago
ttw0kg14931d        nodeapp_visualizer.1   dockersamples/visualizer:stable   myvm1               Running             Running 45 seconds ago
4alkk6og8pae        nodeapp_web.1          takacsmark/swarm-example:1.0      myvm1               Shutdown            Shutdown about a minute ago
k6eu4bsvju28        nodeapp_web.2          takacsmark/swarm-example:1.0      myvm2               Running             Running about a minute ago
ixjb3ztdumfw         \_ nodeapp_web.2      takacsmark/swarm-example:1.0      myvm2               Shutdown            Shutdown about a minute ago
9pocpcbru0ts        nodeapp_web.3          takacsmark/swarm-example:1.0      myvm1               Running             Running about a minute ago
fyl2c8gw7rqe         \_ nodeapp_web.3      takacsmark/swarm-example:1.0      myvm1               Shutdown            Shutdown about a minute ago
hydrprc6bp3u        nodeapp_web.4          takacsmark/swarm-example:1.0      myvm2               Running             Running about a minute ago
1w8ou7h4g15f         \_ nodeapp_web.4      takacsmark/swarm-example:1.0      myvm2               Shutdown            Shutdown about a minute ago
2kqzdn3gdyvj        nodeapp_web.5          takacsmark/swarm-example:1.0      myvm2               Running             Running about a minute ago
vh6scv44k3d1        nodeapp_web.6          takacsmark/swarm-example:1.0      myvm1               Running             Running about a minute ago

We have 6 replicas of our Node application running and one replica of visualizer. Please be patient, it takes some time to apply all the changes.

Let’s see it in visualizer.

Docker Swarm Node application visualizer scaled to 6

Docker has various options for deployment configuration, please refer to the Compose file reference to create the right configuration for your project.

Drain a node

You may want to drain a node in your Swarm to conduct maintenance activities. When you drain a node, Docker will make sure that the node will not receive new tasks and the existing tasks will be rescheduled to active nodes.

Let’s check our nodes first.

$ docker node ls
ID                            HOSTNAME            STATUS              AVAILABILITY        MANAGER STATUS      ENGINE VERSION
yttgwlrspn5ln3ho1qffiy4op *   myvm1               Ready               Active              Leader              18.09.1
tsmjsfj4f9ht5fefxwy2h7nve     myvm2               Ready               Active                                  18.09.1

Both nodes are active. Let’s drain myvm2.

$ docker node update --availability=drain myvm2
myvm2

Let’s check the status of the nodes:

$ docker node ls
ID                            HOSTNAME            STATUS              AVAILABILITY        MANAGER STATUS      ENGINE VERSION
yttgwlrspn5ln3ho1qffiy4op *   myvm1               Ready               Active              Leader              18.09.1
tsmjsfj4f9ht5fefxwy2h7nve     myvm2               Ready               Drain                                   18.09.1

If you check the visualizer output now, you’ll see that all 6 replicas of the Node application are running on the manager node now.

Let’s bring the node back to life.

$ docker node update --availability=active myvm2
myvm2

If you check visualizer now, then you’ll notice that all 6 replicas are still running on the manager node. This is because Docker does not automatically re-distribute containers when a node becomes active after maintenance. The newly activated node will receive new tasks, but the old tasks are not rescheduled automatically.

Let’s redistribute our containers with the following command.

$ docker service update --force nodeapp_web
nodeapp_web
overall progress: 6 out of 6 tasks
1/6: running   [==================================================>]
2/6: running   [==================================================>]
3/6: running   [==================================================>]
4/6: running   [==================================================>]
5/6: running   [==================================================>]
6/6: running   [==================================================>]
verify: Service converged

This command gets the job done, but if you have many services, you’ll want to write your own script to automate this task at scale.

Rolling update

Let’s create a new version of our Node application image. Let’s update the image version in our docker-compose.yml.

image: takacsmark/swarm-example:1.1

Let’s build and push the new image to the Docker Hub.

$ docker-compose build
$ docker-compose push

Start the rolling update by deploying the stack.

$ docker stack deploy nodeapp -c docker-compose.yml

Docker will start updating the running containers in groups of 2 with 10 second delay as we specified in the Compose file.

You can follow the progress regularly running the command to list the tasks in the Node service. You’ll see that the containers are updated in waves as expected.

$ docker service ps nodeapp_web

Alternatively you can use the docker service update --image command to start a rolling update, but I prefer the Compose file variant, because it’s more explicit and you can add automation on top of it.

Swarm networking and service discovery

We defined a custom network in our Compose file, and Docker automatically created this network when we deployed our stack. We were able to access our application using the IP address of any of the hosts in the Swarm. Let’s see how this works.

Docker has a network driver called the overlay network driver. Overlay networks are networks over multiple Docker host machines. You can connect multiple machines that run the Docker daemon using one overlay network.

When we deployed our stack to the Swarm, our user defined network was created in the form of an overlay network. Overlay is the default driver when you are using the Compose file in Swarm mode.

Swarm services use a solution called the routing mesh for service discovery. This means that if you publish ports in your services, the published ports will be available on all Swarm nodes, and you can connect to a service’s published port on any node even if that node is not running a container of the specific service. Your request is redirected to the node that is running the service automatically in the background.

The Swarm implements internal load balancing to distribute requests among replicated services in the cluster.

High availability cluster in the cloud

The two machine Swarm we just set up is for demonstration purposes. Setting up a high availability cluster for production requires careful design and sizing.

If you want to get started with a high availability Swarm setup, you’ll find pre-defined templates that you can use with various cloud providers. Let’s have a look at the AWS template.

Docker provides a link to the latest stable release CloudFormation template on their website.

You can move on from that page using the “Deploy Docker Community Edition (CE) for AWS (stable)” link. At the time of writing this link points to this URL.

You can use the wizard here to set up a high availability Swarm cluster on AWS.

Please note that the default configuration contains 3 Swam managers, 5 workers, so running this setup continuously will definitely generate charges even if you are using the free tier.

This wizard is a great place to start, if you’d like to follow along a complete step-by-step setup, you can find one in my Docker book.

Other container orchestrator solutions you should be aware of

Now that we have seen the key basics of Docker Swarm, let’s have a look at the broader picture of container orchestration solutions.

Docker Swarm is not your only option for container orchestration, it is not even to most popular solution out there. Let’s see what are the main tasks of an orchestrator.

  • Abstract away the underlying infrastructure details.
  • Maintain the desired state of your containers in your cluster described in a descriptor file like the Compose file.
  • Scale your services in-line with your requirements.
  • Secure the communications in the cluster network.
  • Allow service discovery in the cluster.
  • Rolling update of cluster services.

Besides Swarm, there are multiple orchestrator alternatives on the market that you can choose from. The top 4 products considered by most projects are Google’s Kubernetes, Docker Swarm, Mesos and HashiCorp’s Nomad.

Kubernetes by Google is the market leading container orchestrator solution today. Its wide adoption is understandable thanks to Google’s wast experience in cloud computing and the large community around the product. Kubernetes, or k8s in short, is free and open-source. Kubernetes was open-sourced in 2014 and it is maintained by the Cloud Native Computing Foundation.

Swarm is Docker’s built in orchestrator. Introduced in 2014, Swarm was added to the Docker engine. Due to Kubernetes’ wide adoption, Docker’s support for Kubernetes grows with every release.

Mesos and Nomad also have a strong base, although right now Kubernetes seems to be the winner that takes it all.

Wrap up

I hope you enjoyed this tutorial and you have a clearer picture about Swarm and I hope you feel that you built practical skills coding along with me in this article.

Learning Swarm is a great step forward on your journey, it gives you a serous tool-set to run professional applications in high-availability scaled environments.

As you move on, you’ll bump into Kubernetes everywhere you go, I’d suggest to give it a try and see how it fits your requirements.

I wish you great success, feel free to subscribe to the mailing list if you wanna keep in touch, or just leave a comment.

Lessons learned building a Raspberry Pi cluster

Lessons learned building a Raspberry Pi cluster

Shawn Sesna

Shawn Sesna

June 23, 2020 • 6 mins


Like many others, I had to stay home through the COVID-19 crisis, so I decided to build a Raspberry PI cluster to explore running applications on it with Docker Swarm. In this post, I share some of the lessons I learned running the new Raspberry Pi 4 in a cluster with Docker Swarm.

Why

I’m a developer, and I’ve been interested in starting a Raspberry PI project for a while. I’m also interested in cluster computing, but never had a good reason to create a cluster. Then I read about people having great success running the new Raspberry Pi 4 in a cluster with Docker Swarm, so I thought it was an opportune time to learn more.

I kicked off this project with several goals:

  • Have fun as Raspberry PIs are pretty cool hardware.
  • Shift some computing resources from a home hypervisor server running VMs to the small, power-efficient Raspberry PI cluster running containers.
  • Learn more about Docker Swarm.

Raspberry Pi Hardware

These are the parts I used for my project:

I chose the C4Labs Cloudlet case because it allowed me to access a single Pi without having to disassemble the whole case to get to it like the stackable cases. The original design of the Cloudlet case has the fans powered by the Pi. I didn’t want to have to worry about disconnecting cables if I needed to remove a Pi, so I went with the following parts to power the fans:

The Cloudlet case has plenty of room for these extra parts.

Lastly, I needed a network switch to connect the Pi devices to, but I had a spare 8-port, so I didn’t need to buy another. The Raspberry Pi 4 comes with a wireless adapter built-in, so you could utilize that as well.

Creating the cluster

There are tons of blog posts out there that show you how to create a cluster of Raspberry Pi with Docker Swarm. I found How to run a Raspberry Pi cluster with Docker Swarm was clear and easy to follow. All of the details you need are in that post.

Operating the Swarm

Through work, I already had some experience in working with Docker and Kubernetes (K8s), however, I’d never run a Docker Swarm. There were some new concepts to learn when running things in Docker Swarm mode versus a stand-alone Docker instance. For example, where you would normally use a docker run statement, you’d create a service within the swarm to run the container using docker service create. After messing around for a while, I had a fully operational Swarm:

Lesson 1: Not all containers run on ARM

My original intention for this project was to lessen the burden on my VM Hypervisor by running containers. When searching Docker Hub, I found that very few official images would run on the ARM architecture. I could usually find an image that someone made to run on the Raspberry Pi, but they were usually old and not the current version.

In some cases, you can use a work-around and tell Docker not to resolve the image to an architecture:

  • docker service create --name <somename> --no-resolve-image <image>
  • docker stack deploy --name <somename> --compose-file <somefile> --resolve-image never

Lesson 2: Stacks

Stacks are the Docker Swarm way of using docker-compose. In fact, it uses a compose file as one of its arguments. Just like docker-compose, you can define multiple containers within a single file. By default, a stack deployment will create a network for the stack so they can all talk to each other. This makes it easy to refer one container to another just by name. For example, below is a compose file for running Home Assistant on my docker swarm. This stack consists of an MQTT service container, a Home Assistant container, and a MySQL database server container. For reasons I’ll go into later, I configured Home Assistant to use a MySQL back-end for the Recorder:

version: "3.3"

services:

  mqtt:
    image: eclipse-mosquitto
    networks:
      - hass
    ports:
      - 1883:1883
    volumes:
      - /mnt/clusterpi/mqtt/db:/db
      - /etc/localtime:/etc/localtime:ro

  home-assistant:
    image: homeassistant/home-assistant
    networks:
      - hass
    ports:
      - 8123:8123
    volumes:
      - /mnt/clusterpi/home-assistant:/config
      - /etc/localtime:/etc/localtime:ro

  mysqldb:
    image: hypriot/rpi-mysql
    networks:
      - hass
    ports:
      - 3350:3306
    environment:
      MYSQL_ROOT_PASSWORD: "MySuperSecretPassword"
      MYSQL_DATABASE: "homeassistant"
      MYSQL_USER: "hassio"
      MYSQL_PASSWORD: "AnotherSuperSecretPassword"
    volumes:
      - /mnt/clusterpi/mysql:/var/lib/mysql

networks:
  hass:

In the configuration.yaml file of Home Assistant, you can see where I created the connection to the mysqldb container:


# Configure a default setup of Home Assistant (frontend, api, etc)
default_config:

# Uncomment this if you are using SSL/TLS, running in Docker container, etc.
# http:
#   base_url: example.duckdns.org:8123

# Text to speech
tts:
  - platform: google_translate

group: !include groups.yaml
automation: !include automations.yaml
script: !include scripts.yaml
scene: !include scenes.yaml
recorder:
  db_url: mysql://root:MySuperSecretPassword@mysqldb/homeassistant?charset=utf8

Lesson 3: Swarm members act as one

When working with a docker swarm, all of the members of the swarm act as one. Looking at the graphic above, we can see that all of the containers are distributed among the members of the swarm.

When connecting to a container via an exposed port, it’s not necessary to reference the node that is currently hosting the container. We can see that clusterpi-1 hosts the container named viz (which is the web page of the graphic, visualizer). The viz container port is mapped to the host port 80, so I can access the visualizer container web page via http://clusterpi-1. It can also be accessed via http://clusterpi-4, even though clusterpi-4 is not the current host of the container. This also means that any port that has been mapped cannot be used by another container. The mysql_dev container is the only thing that can be mapped to 3306, all of the other MySQL containers (unless they’re replicas of mysql_dev) have to use a different port.

Lesson 4: Persistent storage woes

One of the first lessons you learn with containers is that the data does not persist when the container is destroyed. In order to prevent this, you need to configure the container to map what it would usually store internally to an external volume. Creating volumes on a docker host is fairly easy. You specify a local folder to a contain folder mapping with the -v switch: -v /my/local/folder:/var/lib/data. However, this presents a problem in a docker swarm as there is no guarantee the same host will run the same container each time it is run (okay, technically, you can with constraints, but that defeats the purpose of a swarm). To solve this, we need something that can be accessed by all the members of a swarm, like a network location.

Network storage options

There are two ways this can be accomplished; Network File System (NFS) or Common Internet File System (CIFS).

NFS is usually used by Linux/Unix systems, and CIFS is what is usually used with Windows systems, though Windows does have an NFS implementation. In my home environment, I have a Windows server that I use for a file server, so I chose to use CIFS.

Configuring CIFS

This article does a really good job of explaining how to use CIFS with Linux, including how to mount a Windows share. I connected my Pi devices to my file server using CIFS with an entry in /etc/fstab, though I did have one side-effect. When I rebooted the cluster, they all came up with access to the file share, but all of my containers ended up on the Manager node. Removing the entry from /etc/fstab on one of my workers confirmed that it was indeed causing the problem.

Wait for network connectivity

The issue of all containers ending up on the Manager node vexed me for a little while. Eventually, I resolved it by adding another option to the CIFS line in /etc/fstab; _netdev. The _netdev switch delays mounting until networking has been enabled. After this was added to all Pi devices, the manager was once again able to distribute the containers.

Bypass permissions checking

Some containers alter the file system and file system permissions when starting, such as Postgres. When executing entirely within the container or a local file system mount, this is usually not a problem. However, when using a Windows share via CIFS, this usually crashed the container, stating the operation wasn’t supported. To bypass this, I found the noperm option for CIFS, which skips the permissions check and just moves forward. This allowed me to get passed that issue with Postgres, but I was never able to get a Windows CIFS share to work with the Postgres container (but that doesn’t mean it’s not possible).

CIFS and SqlLite are not friends

Having successfully configured a CIFS share for my HomeAssistant container, I found that it was having a problem with the SqlLite database that it uses by default, it kept reporting the database was locked. After encountering the same issue with the pgAdmin (Postgres management) container, I did a little Googling and found many posts describing the same behavior, with almost all of them recommending something other than SqlLite. This was the reason I included a MySql container for the Recorder service in my HomeAssistant stack deployment.

Conclusion

This was a fun a really fun project for me, and I learned a lot about Docker Swarm. Creating a Raspberry Pi cluster is great for learning concepts like Docker Swarm and Kubernetes.