https://www.youtube.com/watch?v=0pwonY1aRpc
【AI自动化教程】超轻松!让AI帮你管理社交媒体,再也不用熬夜发帖了!社交媒体AI助手搭建完整教程,附赠模板,导入即可使用! – YouTube

https://www.youtube.com/watch?v=0pwonY1aRpc
【AI自动化教程】超轻松!让AI帮你管理社交媒体,再也不用熬夜发帖了!社交媒体AI助手搭建完整教程,附赠模板,导入即可使用! – YouTube
https://www.youtube.com/watch?v=wW1AwGysG_Q
【AI自动化工作流】零基础入门教程|用Make.com轻松打造你的第一个AI助手(2024)|高效工作必学! – YouTube
https://www.smarthomebeginner.com/best-docker-containers-for-home-server/
60+ Best Docker Containers for Home Server Beginners 2024 – SHB
https://www.youtube.com/watch?v=87TwZ05SSGc
Flux.1 本地部署!媲美Midjourney的顶级AI绘图模型 ,免费开源,ComfyUI 一键安装,效果惊人! – 零度解说 – YouTube
https://www.freedidi.com/13266.html
本地部署 Flux.1 最强文生图大模型!Comfyui 一键安装,简单又方便-零度博客.url
Flux ComfyUI by ZeroTalk
https://www.virtualhere.com/node/306
https://www.youtube.com/watch?v=GQHpq7uYbAU (DIY Wireless StreamDeck)
https://www.youtube.com/watch?v=uxBHeMDFZuI (Using Microsoft Flight Simulator + VR googles + Virtualhere for remote play in another room)
https://www.youtube.com/watch?v=wZ3HHn1uAiI (Video from Amazon shows how to use VirtualHere to access local iDevices from AWS Mac Instances)
https://www.xda-developers.com/turn-raspberry-pi-into-a-usb-hub/ (Article about VirtualHere on a Pi)
https://www.youtube.com/watch?v=1OU4pzaxzQg (Wireless flight controls via VirtualHere)
https://www.youtube.com/watch?v=-Q9wPCrAOJY (Remote Desktop Mouse/Keyboard in VR with VirtualHere (Japanese))
https://www.mdpi.com/2079-9292/12/17/3659 (Wireless force feedback in mixed VR/AR environments)
https://www.youtube.com/watch?v=Whnbgv5EQU4 (Using virtualhere to control a laser engraver via wifi (in Porteguese))
https://www.finalbuilder.com/resources/blogs/code-signing-with-usb-toke… (Use VirtualHere to redirect USB EV Code Signing dongles, so you can sign inside a VM)
https://www.connectioncafe.com/is-fall-guys-split-screen/ (VirtualHere helps pass through controllers for Fall Guy Video Game Split screen)
https://www.tomshardware.com/news/raspberry-pi-zeo-w-wireless-stream-de… (Wireless Stream Deck with VirtualHere)
https://www.youtube.com/watch?v=HhI03N9SmFc (Wireless facial tracking on Quest2 via VirtualHere)
https://youtu.be/NKrNOH5HzbU (Control all your portable Astro equipment via virtualhere)
https://cloud-google-com.translate.goog/blog/ja/topics/customers/tv-asa… (TV Asahi uses VirtualHere to control TV Programming equipment from the Google Cloud)
https://www.youtube.com/watch?v=d7LvgomyybI (Cloud Gaming with VirtualHere and Logitech Racing Wheel)
https://www.youtube.com/watch?v=IPjaxLRkSys (Racing setup with VirtualHere and PICO 4)
https://www.youtube.com/watch?v=CdQFk_L3WlE (Control your Diode laser via virtualhere)
https://citytheatrical.com/docs/default-source/interviews/kevin-barry-r… (VirtualHere helps to wirelessly track radio interference on Broadway!)
https://forum.corsair.com/forums/topic/179029-corsair-wouldnt-do-it-so-… (Make corsair keyboard wireless via VirtualHere and a Pi)
https://www.hagensieker.com/wordpress/2022/06/25/using-a-sdrplay-rspdx-… (SDR Radio via VirtualHere)
https://mixinglight.com/color-grading-tutorials/parsec-virtualhere-remo… (Remote Colour Grading using VirtualHere and Parsec)
https://dronebotworkshop.com/pi-10-virtualhere/ (Extend your USB with VirtualHere)
https://www.youtube.com/watch?v=PdEbPya7czY (Racing wheel via VirtualHere and pi02w)
https://www.youtube.com/watch?v=pFESUGjbxeo (Make your vive facial tracker wireless using VirtualHere)
https://youtu.be/neCHO7eWlt8 (Make YawVR wireless using a pi with wifi)
https://forums.holley.com/showthread.php?50178-Wireless-Connectivity-to… (Access Vehicle ECU via VirtualHere wirelessly)
https://www.youtube.com/watch?v=OAW9GRNzVTs
https://www.mdpi.com/1424-8220/20/23/6782/htm (A Journal paper about mixing WiGig and WiFi mediums (using VirtualHere for motion transfer) to improve Wireless VR latency)
https://www.reddit.com/r/Zwift/comments/jrtw49/ps3_wireless_keypad_for_… (Use your phone+virtualhere to make a wireless PS3 Keypad for Swift racing)
https://linustechtips.com/main/topic/1261072-truly-wireless-mod-for-vir… (Truly Wireless Mod for Virtually Any Keyboard)
https://www.reddit.com/r/OculusQuest/comments/jdexlu/wireless_playseat_… (VirtualHere works well on the new Oculus Quest 2!)
https://www.youtube.com/watch?v=YsHzJHykxNA (A user demoing virtualhere on some different platforms)
https://www.youtube.com/watch?v=8zF8cAnpd08 (Use Stream Deck in a VM via VirtualHere)
https://youtu.be/KDbOFftyEww (Use SDR over the network via VirtualHere Video)
https://www.sdrplay.com/docs/VirtualHere.pdf (SDR over the network via virtualhere documentation)
https://www.youtube.com/watch?v=ZTIGlutAzR8 (Use a HOTAS flight stick wirelessly via VirtualHere)
https://www.youtube.com/watch?v=sbHBVL0oPrk (Cloud gaming with USB devices via VirtualHere)
https://www.youtube.com/watch?v=12Y-k0D7Y38 (Game streaming with microphone via Virtualhere)
https://www.cloudynights.com/topic/689403-truly-wireless-setup-without-… (Wireless astronomy using VirtualHere)
https://www.youtube.com/watch?v=9YDYPKx2pfE (A user made a video about setting up VirtualHere on the Samsung Dex)
https://www.youtube.com/watch?v=3XWKBOTL4ow (Using VirtualHere to pass through gaming mouse in Samsung Dex and Shadow Game Streaming)
https://onion.io/omega2-wireless-lidar-kit-quickstart (Wireless LIDAR kit)
https://www.reef2reef.com/threads/guide-how-to-use-profilux-4-over-netw… (Access your aquarium computers remotely via VirtualHere)
https://www.pro-tools-expert.com/production-expert-1/2019/1/4/how-i-bui… (VirtualHere for accessing iLok)
https://github.com/younglim/barebones-device-farm (Use virtualhere to create a Android Device farm for testing)
http://www.mastersnyengineering.org/flyer.html (Control CNC Machine via VirtualHere in the Lab)
https://www.dsogaming.com/first-impressions/googles-project-stream-assa… (Use VirtualHere with Googles “Project Stream" to get your XBox Controller working!)
https://www.reddit.com/r/trucksim/comments/9kba2j/shield_tv_virtualhere… (Living room truck simulator with VirtualHere + Steering Wheel()
https://www.youtube.com/watch?v=WePiCkAVJeI (Use Virtualhere to pass through mouse in Shadow PC correctly)
https://www.youtube.com/watch?v=XcDsy3eGfgM (Run PC Racing simulator in the cloud using VirtualHere for USB Passthrough)
https://www.rtl-sdr.com/using-the-virtualhere-usb-server-for-remote-rtl… (Software Defined Radio via VirtualHere)
https://www.youtube.com/watch?v=L7I5onJE3AE (Fully wireless battle suit VR using Virtualhere to passthrough the USB signal)
https://www.pcwelt.de/a/alle-usb-geraete-mit-virtualhere-uebers-netzwer… (German, VirtualHere on the Fritz!box)
https://youtu.be/SK0dv1mhddI (Cloud Gaming using virtualhere to pass-thru controllers)
https://www.youtube.com/watch?v=e7R6a8L8Ozk#t=01m18s (Use an audio controller from anywhere)
https://github.com/OpenTPCast/Docs (Replaces stock firmware with virtualhere based USB server allowing VR Headset microphone and aux USB port to work!)
https://www.netzwelt.de/news/160725-nas-usb-server-lan-nutzen-so-gehts… (Using a NAS as a VirtualHere USB Server – German)
https://hub.docker.com/r/moritzf/virtualhere (VirtualHere for Docker)
https://www.youtube.com/watch?v=CurVpidp5eU (VirtualHere controlling party LED’s) (German)
https://www.youtube.com/watch?v=TxoTW6FkIxQ (Stream windows 10 games to NVIDIA Shield Tablet using VirtualHere for Android)
http://www.n0agi.com/remote-control-motorola-xprslr-rigs (manage radios over the internet)
https://www.youtube.com/watch?v=6BK_4NFFtkE
https://www.linkedin.com/pulse/our-journey-toward-continuous-delivery-b… (UK Health Services using VirtualHere to create a multi-smartcard test setup for continuous integration testing)
https://www.labohyt.net/blog/server/post-818/ (Japanese blog, installing virtualhere as a raspberry pi USB device server)
http://www.cheesyboofs.co.uk/Network-USB—VirtualHere
https://www.youtube.com/watch?v=OPlKNnNq4hQ (Installation video)
http://littlet1d.blogspot.co.uk/2015/12/nightscout-on-640g-on-go.html (Using virtualhere for remote diabetes monitoring)
http://www.usb-hub-over-network.ru (Russian) (usb dongle server)
https://www.reddit.com/r/nvidiashield/comments/46emni/how_to_use_the_st… (using Steam Gaming controller with nvidia Shield TV)
http://www.stryder-it.de/steamremote/help_pc_usbextend.php (German, steam gaming remote)
http://blog.selectronic.fr/tutoriel/un-serveur-dimpression-wi-fi-pour-i… (French, 3D printer remote management)
http://itpro.nikkeibp.co.jp/atcl/mag/14/236763/070900010/ (Japanese raspberry pi magazine)
http://stargazerslounge.com/topic/231664-new-iki-hitec-ror-in-kent/ (Remote telescope interation)
http://www.wctek.com/shop/home/31-xyzhub.html (3D printer server)
http://www.ma55ey.co.uk/2015/04/using-raspberry-pi-as-remote-seneye.html (Aquarium Monitoring)
“Just wanted to send a quick thank you for this amazing piece of software. I’m using virtualhere on raspberry pi on stage with our band to use midi keyboards on a long distance.Boris" http://www.netskymusic.com
http://vmwarebits.com/content/virtualhere-raspberry-pi-usb-server (Virutalhere + VMWare for using device in the Virtual Machines)
http://www.instructables.com/id/Wireless-tethered-shooting-with-any-DSL… (Remote wireless DSLR camara control via virtualhere)
http://bsmuir.kinja.com/building-a-licence-dongle-server-with-a-raspber… (Dongle license server)
https://www.youtube.com/watch?v=A_DbNtRkAm0 (VirtualHere + Gaming Steering wheel)
http://geeklingo.net/qnap-ts-653-pro-running-windows-10-vm-virtual-usb/ (QNAP + Win10 + VirtualHere server on the QNAP = remote USB device access)
http://blogi.burtsoff.net/tag/scanner/ (Old scanner + virtualhere = wireless scanner)
http://www.sysrun.de/2014/01/raspberry-pi-als-usb-server/ (german)
http://geotagging-blog.de/2014/03/drahtloses-lightroom-tethered-shootin…
http://forum.flirc.tv/index.php?/topic/1022-xen-hypervisor-windows-7-gu…
1. Our first task before installing Proxmox onto the Raspberry Pi is to update the package list cache and upgrade any out-of-date packages.
You can perform both tasks by using the following two commands within the terminal.
sudo apt update
sudo apt upgradeCopy
2. Your next step is to ensure that curl is installed on your Pi. We will be using curl to grab the GPG key for the Proxmox ports repository that we will be relying on.
You can install this package by using the following command within the terminal.
sudo apt install curlCopy3. Before proceeding with this tutorial, you must set up your Raspberry Pi to use a static IP address.
The best way to do this is using DHCP reservation in your router. However, we have a guide that shows you how to do this through your Raspberry Pi if you don’t have access to your router.
4. After setting up a static IP address, we must now edit the hosts file. Proxmox expects your hostname to point to the IP address of your Raspberry Pi.
You can begin editing the hosts file on the Raspberry Pi using the nano text editor by running the following command.
sudo nano /etc/hostsCopy5. With the hosts file open, you should see a line similar to the one below. Our hostname is set to the default “raspberrypi“, but yours might differ.
127.0.0.1 raspberrypiCopyAfter finding this line, you will want to replace “127.0.0.1” with the local IP address of your Raspberry Pi.
In our case, our Pi’s IP is “192.168.0.32” so we changed the line to look like the following.
192.168.0.32 raspberrypi6. After making these changes, save and quit by pressing CTRL + X, Y, and then the ENTER key.
7. To verify that our changes are working, we can use the hostname command to output the IP address of our Raspberry Pi.
hostname --ip-addressCopyIf you have configured everything properly, the static IP of your Pi should be returned.
192.168.0.328. The next thing we must do to use Proxmox on our Raspberry Pi is set a password for the “root” user. If we don’t set a password for this user we will be unable to login through the Proxmox web interface.
You can set a password for the root user using the command below within the terminal.
sudo passwd rootCopy9. To set a password, you must enter it twice, as shown below. We recommend that you set a strong password for this.
A password manager such as NordPass (Affiliate Link) makes generating and storing strong passwords significantly easier.
New password:
Retype new password:10. We are finally at the stage where we can begin adding the Proxmox Ports repository to our Raspberry Pi. This repository is managed by a third-party but allows us to install versions compiled for the Raspberry Pi’s hardware.
Our first step in this process is to add the GPG key for the repository. This key helps verify that the packages legitimately come from the Proxmox ports repository.
curl -L https://mirrors.apqa.cn/proxmox/debian/pveport.gpg | sudo tee /usr/share/keyrings/pveport.gpg >/dev/nullCopy11. With the GPG key added, we can now add the repository itself to our sources list.
Use the command below to save the repository link into a file called “pveport.list“.
echo "deb [arch=arm64 signed-by=/usr/share/keyrings/pveport.gpg] https://mirrors.apqa.cn/proxmox/debian/pve bookworm port" | sudo tee /etc/apt/sources.list.d/pveport.listCopy12. Since we made changes to the sources list, we must update the package list cache again by running the following command.
If we don’t do this, the package manager will be unaware of the repository we just added.
sudo apt updateCopyThese next couple of sections will ensure that your network will continue to function once Proxmox has been installed. Without these steps you will lose network connection later.
13. With everything in place, we can finally begin installing Proxmox on the Raspberry Pi.
The first package that must be installed on our system is “ifupdown2“. Proxmox uses this package to handle the network.
sudo apt install ifupdown2CopyPlease note, if you run into an error that says the following, there are a couple of extra
If you see the following error message when installing “ifupdown2” then you will need to follow steps “a” and “b” below. Otherwise, skip straight to step 14.
error: Another instance of this program is already running.a. To work around the “already running” error, we will need to do some workaround steps to get ifupdown2 running.
This step involves deleting a temporary file that the ifupdown2 package is searching for during installation
sudo rm /tmp/.ifupdown2-first-installCopyb. With the temporary file removed, we need to re-run the install process for ifupdown2 again by using the following command.
This will ensure that the final setup steps are properly executed.
sudo apt install ifupdown2Copy14. Our next step is to make some adjustments to the interfaces file. If we don’t make these changes, Proxmox will break when your Raspberry Pi restarts.
With these changes we will be setting our “eth0” interface to manual and create a new network interface that will bridge your connections and be used by your virtual machines.
You can begin to write this file by using the following command.
sudo nano /etc/network/interfacesCopy15. Within this file, you will want to add the following lines to the bottom of the file. There is a chance some of these interfaces are automatically specified, delete them and replace them with the values we have specified here
While filling out this file you must replace two values.
<IPADDRESS>: Change this placeholder with the IP address of your Raspberry Pi. This must be the local IP that it is accessible on.<GATEWAY>: Replace this placeholder with the IP address of your gateway. Typically this will be the IP of your router.
In a lot of cases this will actually be “192.168.0.1“.
auto lo
  iface lo inet loopback

auto eth0
  iface eth0 inet manual

auto vmbr0
iface vmbr0 inet manual
        address <IPADDRESS>
        gateway <GATEWAY>
        netmask 255.255.255.0
        bridge-ports eth0
        bridge-stp off
        bridge-fd 0Copy
16. Once you have filled out this file, save and quit by pressing CTRL + X, Y, and then ENTER.
17. To ensure these network changes are working, restart your Raspberry Pi by running the following command in the terminal.
sudo rebootCopy18. Finally, you can install Proxmox VE and a few required packages by typing the following command in the terminal.
This installation process can take a few minutes, so be prepared to wait a few minutes. Additionally, there are a few prompts you will have to go through during installation.
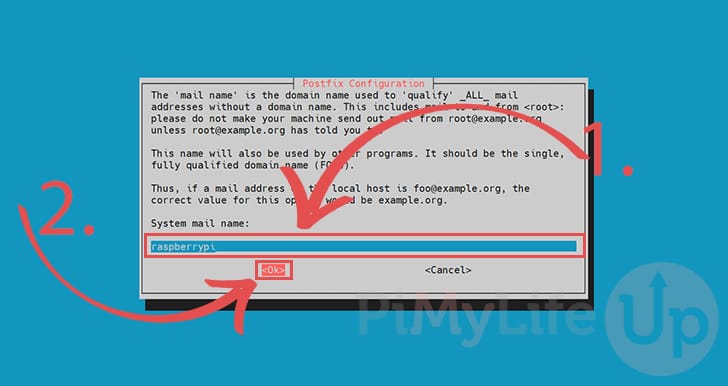
sudo apt install proxmox-ve postfix open-iscsi pve-edk2-firmware-aarch64Copy19. During installation, you will be asked to configure Postfix. You can navigate this menu using the ARROW keys to move and ENTER to select.
If you are unsure what you are doing here, select the “Local only” option.

20. Next, you will be asked to set the mail name for Postfix to utilize (1.).
Again, if you don’t know what you are doing here, leave the default name and press ENTER to continue (2.).
21. Once Proxmox finishes installing to your Raspberry Pi, it should be safe to access its web interface.
All you need to access the web interface is the IP address of your Raspberry Pi.
hostname -ICopy22. With your IP address in hand, you will want to go to the following address in your favorite web browser. Please note if you can’t connect, try restarting your Raspberry Pi and waiting a few minutes.
Ensure that you replace “<IPADDRESS>” with the IP of your Raspberry Pi.
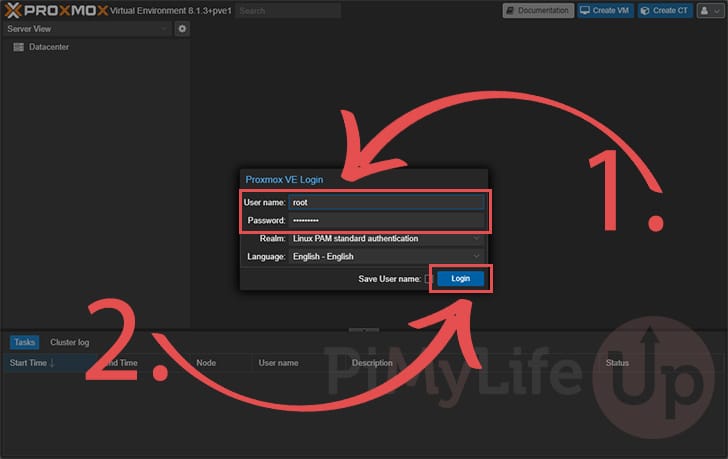
https://<IPADDRESS>:8006Copy23. With the Proxmox web interface now open in your web browser, you must log in to your account.
Start by typing in the username as “root” and then use the password you set earlier for this user (1.).
Once you have filled in your information, click the “Login” button (2.).
24. You should now have access to the Proxmox web interface.
You can begin to set up new VMs through this interface as well as configure Proxmox VE itself.

Hopefully, at this stage in the tutorial, you will now have Proxmox VE installed on your Raspberry Pi.
You can utilize this tool to set up and manage virtual machines on your Pi. It is a powerful hypervisor, especially for those dealing with multiple virtual machines.
Please feel free to leave a comment below if you have run into any issues with getting this software to work on your device.
If you found this tutorial to be helpful, we highly recommend checking out our many other Raspberry Pi projects.
25 Finest Sex Toys Of 2024: The Best Sex Toys For Absolutely Everyone
Today’s choices cater to quite a lot of tastes and preferences nipple stretchers, making it simpler than ever to search out something that feels simply right for you. From sensible masturbators to high-tech vibrating toys, this part dives into the highest categories of male sex toys designed to boost solo play. I sought out recommendations from a couple of of our trusty PureWow editors who have personally examined a number of the gadgets under. A high-quality intercourse toy can cost anyplace from $50 to $200-plus. “Things that can make a intercourse toy costlier are issues like materials, motors and tech and other features and capabilities,” says Finn.
This vibrating cock ring slides over the penis while teasing the clitoris with 10 powerful vibrating modes. Lelo is a Swedish company that offers progressive and good-looking intercourse toys. Target is right for the one that is new to intercourse toys or simply not searching for something too crazy.
For over fifty years beaded penises, Suzies has been the #1 national retailer of adult novelties chastity tubes, lingerie, and pleasure products. We present premium products in a cushty and upbeat atmosphere, together with the education our friends must make a assured buy. If you already bought Le Wand pussy sleeve g spot dildo, you might as nicely splurge and purchase the Le Wand Silicone Attachment, too. The attachment suits on the tip of the wand and transforms it into a masturbation sleeve beaded penises0, so anybody with a penis can get pleasure from the best “handjob" of their life. Our brand values are inclusivity, well-being bondage anal hook, intercourse positivity, respect and empowerment.
Shopping for luxurious sex toys on-line, discover exclusive offers on an arousing g-spot vibrator, body-safe anal dildos or bondage gear, we have it all. If you favor to be naughty on the mattress, you’ll have the ability to try our fun space for that nice evening. A quirky night time full of warm ecstasy is only a gentle stroke. From massagers, furry love cuffs, and eye masks large anal toy, you can get an edible candy pose bag, candy bra, candy g-string and an unique bundle equipment at a jaw-dropping value. These intercourse toys are sufficient to make Indian type intercourse a journey of pleasure and fun.
Neon Coyotes presents the Orbit Collection—a high-impact lineup of luxurious day collars and cuffs in slim silhouettes designed for many who search style and restraint. These evaluations are managed by Bazaarvoice and comply with the Bazaarvoice Authenticity Policy, which is supported by anti-fraud expertise and human analysis. Our lingerie for men and women are in sizes ranging from SM to 3X/4X. What if discovering your soulmate was as simple as placing on your favourite fragrance? Find out how scent might help you to draw new partners double ended sex toy, improve your confidence, and create… Plus, you will get first peek all of the spiciest toy critiques and movies.
“Masturbation permits you to lean into pleasure—what makes you orgasm, what your body responds to — and this can enhance companion sex too,” Zar adds. According to sex therapists, prioritizing your pleasure provides advantages for your self, and thus large anal toy, your companion. With common use, they can elevate your sexual experience it doesn’t matter what you’re in the mood for.